2260 S. Church St. Suite 601 |
||||||||||
Phone: |
(336)226-0425 - Alamance Co. |
|||||||||
| 1- | (888)815-7284 - Toll Free | |||||||||
Fax: |
(336)226-1688 |
|||||||||
Email Us |
||||||||||
How to get your personal webpage on the Internet |
First the Rules:
- Netpath, Inc. and Stratonet, Inc. cannot be held responsible for the contents of any user-generated home pages on this system (as per Netpath's Terms and Conditions).
- Do not ask for free help from us. Since we charge for developing and installing home pages, it would not be fair to our paying customers to give help for free. If you call us for help, you will be billed at our going rate of $50 per hour if we do HTML development or to provide helpdesk duties. This also includes software configuration.
- Do not post commercial homepages. This service is designed to benefit the individual who wishes to experiment with home pages. Do not use it for commercial gain (as in post home pages for your company or a friend's company, etc.). Commercial pages must be placed with our permission since commercial sites are a billable item.
- Do not post lewd or offensive homepages. Apply the standards of general morality as refelected in our area when deciding what to place on your home page. Bear in mind that we are not restricting users access to these pages and therefore they may be seen by minors. If you post material that is deemed questionable, we reserve the right to NOT create a link to it.
On the other hand, we also want to be able to fix problems that you detect. If you find yourself against a brick wall, call us and tell us. If we determine that it is our problem, we will fix it. If we see that the problem is on your side then we will tell you that it is and let you determine if you wish to proceed and be billed. This is the only way to be fair.
The Basics:
You will need to have a basic understanding of what a FTP program is and what functions it can do. You can download several different FTP programs from sites like www.tucows.com or www.windows95.com. Some of the more popular FTP Programs are CuteFTP and WS_FTP. They should all have the basic features such as upload/download capabilities, change directory, change mode, create new directory - all of which you will use to create and maintain your website.
After you decide on a FTP program, you will need to configure the program
to connect to our web server. Below are sample screens taken from
CuteFTP's 'Add Site' and WS_FTP's 'Session Properties'.
CuteFTP
You can put any name you would like for the Site Lable, however it is recommended that you use a descriptive name for ease. The Host Address will be www.netpath.net. Enter your Netpath login name where it asks for User ID and your Netpath login password for the Password. This is all information needed to login to our Web Server. Click OK to close the Add Host window. Now select the newly created Site from the displayed list and click 'Connect'. This will log you into our Web Server and put you into your root directory.
WS_FTP95 LE:
First click 'New' to add a new profile. You can put any name you would like for the Profile Name, however it is recommended that you use a descriptive name for ease. The Host Name/Address our server will be www.netpath.net. Enter your Netpath login name where it asks for User ID and your Netpath login password for the Password. This is all information needed to login to our Web Server.
Click Apply to add the new profile. Then click OK to login to the web server.
All webpage information must be kept in a special directory called public_html. You will need to create this
directory before you can publish your website. In CuteFTP, look under the 'Command' option and click 'Make New Dir' or press 'Ctrl+M'. In WS_FTP, click on the ' MkDir' button. Now type in in all lowercase letters public_html and click OK.
Now you will need to change the permissions on the public_html directory in order to allow the outside world access to view your web page.
To change the permissions using CuteFTP, click one time on the public_html directory in the right column. Then look under the 'Command' option and click 'Change File Attributes' or press 'Ctrl+A'. Set directory permissions to 755. In WS_FTP, click one time on the public_html directory in the right column, then right click on the public_html directory and select the chmod(UNIX) command. Place checks beside the following options: Owner - Read, Write, Execute / Group - Read, Execute / Other - Read, Execute. Then click OK to save changes and set the permissions.
You are now ready to upload to web pages and images. Change to the public_html directory by
double-clicking on the public_html directory in the right column. Now, in the left column, find the directory on
your computer that contains the web page information. 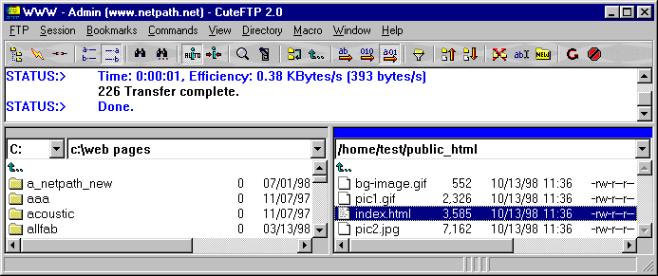 Now it is simply a matter of selecting the files from the left column (host) and 'dragging' them to the right
column (server). This works the same in both versions of FTP programs mentioned in this tutorial.
Now it is simply a matter of selecting the files from the left column (host) and 'dragging' them to the right
column (server). This works the same in both versions of FTP programs mentioned in this tutorial.
After uploading all files that you have ready for your website, you will need to make one final change to make the files viewable to the general public.
To change the permissions using CuteFTP, highlight the file that you want to set the permissions for by clicking one time on it. Then look under the'Command' option and click 'Change File Attributes' or press 'Ctrl+A'. Set file permissions to 644.
In WS_FTP, click one time on the file that you want to set the permissions for, then right click on the file and select the chmod(UNIX) command. Place checks beside the following options: Owner - Read, Write / Group - Read / Other - Read. Then click OK to save changes and set the permissions. Repeat this process for each file in the public_html directory.
Now you will need to open your Web Browser to access your web page. When the page that loads by default has finished loading, type in the URL as http://www.netpath.net/~username/ (ie. If your user name is joe, your home page address is http://www.netpath.net/~joe) in the Location or Address field. This should display the 'main' or 'index' page for your site. If not, see Common Problems and File Names section below.
Please send us an e-mail and let us know if this web page helps you in getting your personal web page uploaded and online with Netpath. Also send any suggestions that you have for improving this page. Thanks.
|
|
This page has been visited
5339
times since Aug 2000!
Copyright © 2000, Netpath, Inc. This site was designed and written by Mark Matherly. |